Taping in Physiotherapy — What It Is, How It Helps, and When It’s Right for You!

You may have seen athletes covered in bright, colourful tape and wondered- does that really work?

This past year, I spent a lot of time doing sports coverage, and naturally became very familiar with taping. In physiotherapy, taping can be used as a method to manage pain or to help patients feel more confident returning to activity. In this post, I want to break down its purpose, what the research says, and how it could potentially fit into your rehabilitation plan.

Purpose of Taping

Taping can be a very beneficial tool in a treatment plan, but it is not necessarily the best fit for every patient/ injury. The goal of taping can be to help manage pain/modify symptoms, provide sensory feedback, or support return to activity/ sport. The idea of taping is not to “fix” the problem, but to be used as a modality within a management plan.

Types:

  • Rigid taping: involves stiffer straps like leukotape or athletic tape (zinc oxide). Often used to limit excessive motion in joints and provide mechanical support (ex. Closed basket ankle taping).
  • Kinesio (elastic) taping: stretchable tape designed to allow for more movement and provide sensory feedback.

What does the evidence say?

A 2023 systematic review supported that KT taping can reduce pain and disability across multiple body regions when used alongside other interventions (Tran et al., 2023). There are also some specific conditions that taping has shown to be beneficial for. In Patellofemoral Pain Syndrome, taping has shown to reduce pain and improve knee function when combined with exercise therapy (Gao et al., 2025) . Additionally, kinesiotaping may help with symptom reduction in cases of chronic low back pain (Sun & Lou, 2021). However, most of the research concludes that taping does not work well as a standalone treatment and does not reliably improve performance in sport.


Taping vs Bracing

Both taping and bracing can be used as strategies to improve pain and function.

When reviewing the research, there is no definitive answer as to which method is better,

As the evidence is mixed, choice can come down to patient preference. Taping is typically less expensive and can be great for short-term symptom modification or support.

However, I generally suggest trying bracing options in cases where patients may have benefited from taping and desire a longer-term support. Bracing tends to have fewer skin complications compared to taping.

Quick tips before taping!

  • Check skin for sensitivities/allergies before applying tape.
  • Prepare the skin (clean/shave if needed).
  • Do not tape over blisters, skin irritations, wounds, or areas with altered/ reduced skin sensation.
  • Monitor for skin irritations while the tape is on. Take the tape off if it becomes uncomfortable.

To Summarize…

Taping can be a beneficial tool within a rehabilitation plan! The evidence suggests that it should not be used as a treatment on its own, but is most beneficial when used in conjunction with exercise therapy. Most tape jobs are quite quick to try and are fairly straightforward. Another great aspect of taping is that you can also do most tape jobs on your own! I encourage patients to ask their physiotherapist if taping may be a good fit for them. When used in the right context, taping can be a quick and effective way to support you while you continue working toward your goals.

References

Gao, P., Yan, Z., Tang, F., Zhang, J., Zhang, Q., & Li, X. (2025). The efficacy of Kinesio taping combined with exercise therapy on patients with patellofemoral pain syndrome: A systematic review and meta-analysis. Journal of Back and Musculoskeletal Rehabilitation. Advance online publication. https://pubmed.ncbi.nlm.nih.gov/41143853/

Ghai, S., Sharma, R., & Kumar, R. (2024). Proprioceptive effects of rigid versus elastic taping in musculoskeletal conditions: A systematic review and meta-analysis. BMC Musculoskeletal Disorders, 25, 252. https://bmcmusculoskeletdisord.biomedcentral.com/articles/10.1186/s12891-024-07571-2

Sun, G., & Lou, Q. (2021). The efficacy of kinesio taping as an adjunct to physical therapy for chronic low back pain for at least two weeks: A systematic review and meta‑analysis of randomized controlled trials. Medicine, 100(49), e28170. https://pmc.ncbi.nlm.nih.gov/articles/PMC8663828/

Tran, T., Nguyen, H., Le, H., & Pham, Q. (2023). Efficacy of kinesio taping compared to other treatment modalities in musculoskeletal disorders: A systematic review and meta-analysis. Journal of Clinical Rehabilitation, 37(4), 221–234. https://pubmed.ncbi.nlm.nih.gov/34711091/


By Paige Phills

New Parents? New Aches! Looking After Your Body While Looking After Your Kids (& Grandkids)

As a father of two young boys (aged 3 and 1), I know how physical parenting can be. Lifting toddlers, carrying strollers, changing diapers, and spending lots of time on the floor all add up. Most parents expect to be tired — fewer expect the aches and pains that come with it.

Caring for young children often puts our bodies into a flexed posture: rounded shoulders, tight hips, and a sore lower back. When this becomes your daily norm, pain can creep in.

Common Aches New Parents Experience & How to Stretch & Strengthen

Lower back pain

Cause:  Frequent lifting and bending

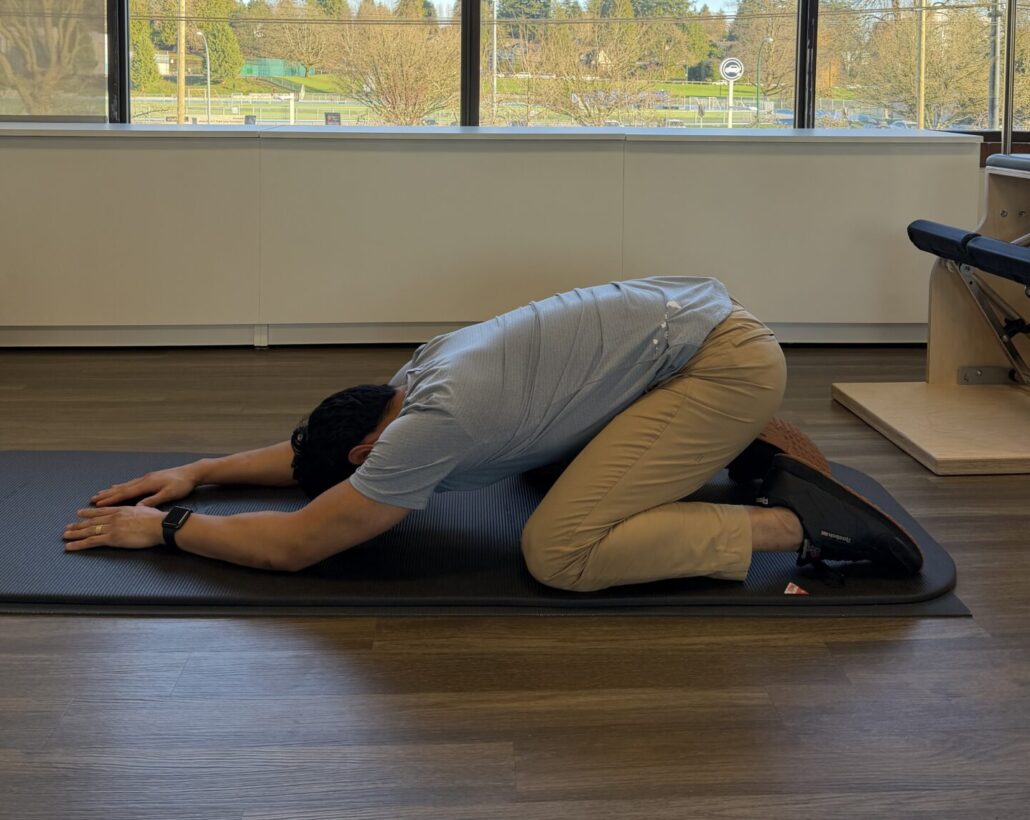
Stretch:  Child’s pose — kneel on the floor, sit back on your heels, reach arms forward. Hold 20–30 seconds.

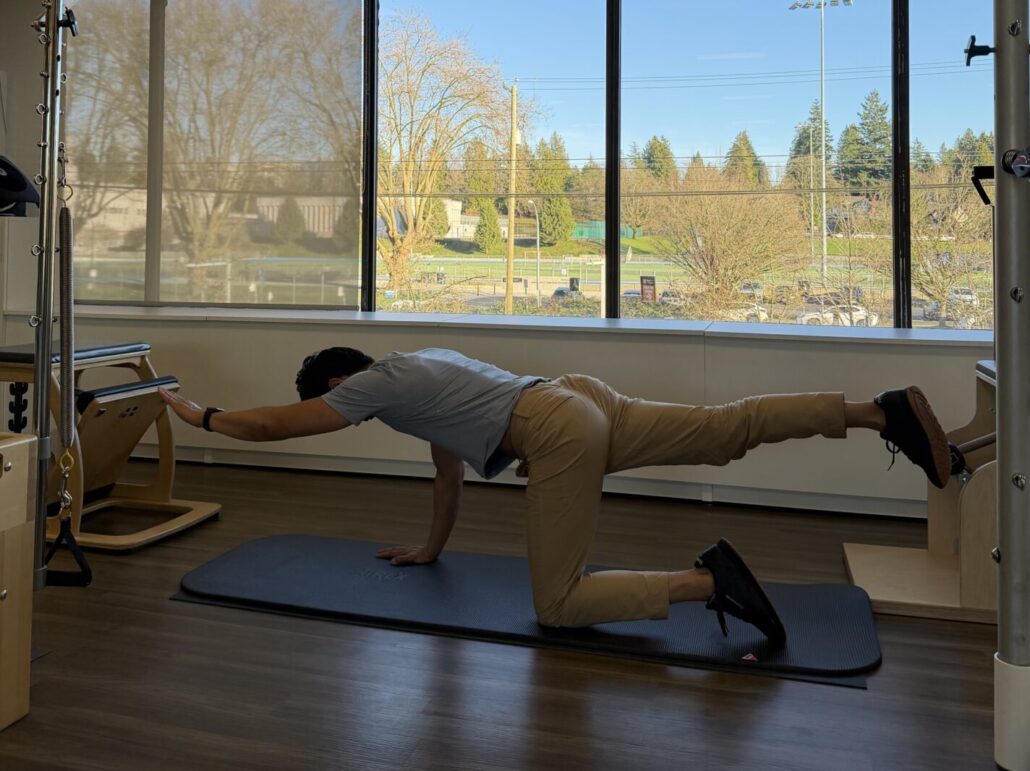
Strengthening:  Bird-dog — on hands and knees, extend opposite arm and leg, keeping core engaged. Hold 5–10 seconds, repeat 5–10 times per side.

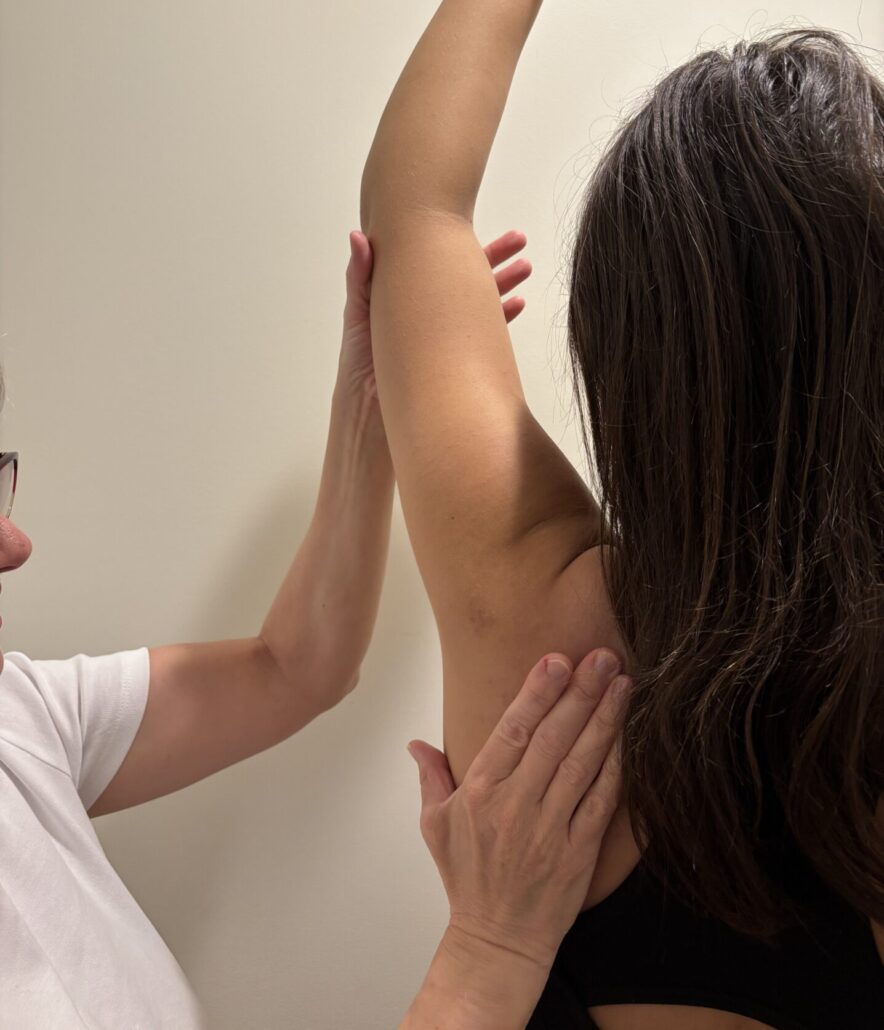
Neck and shoulder tension


Cause:  Feeding, rocking, and carrying

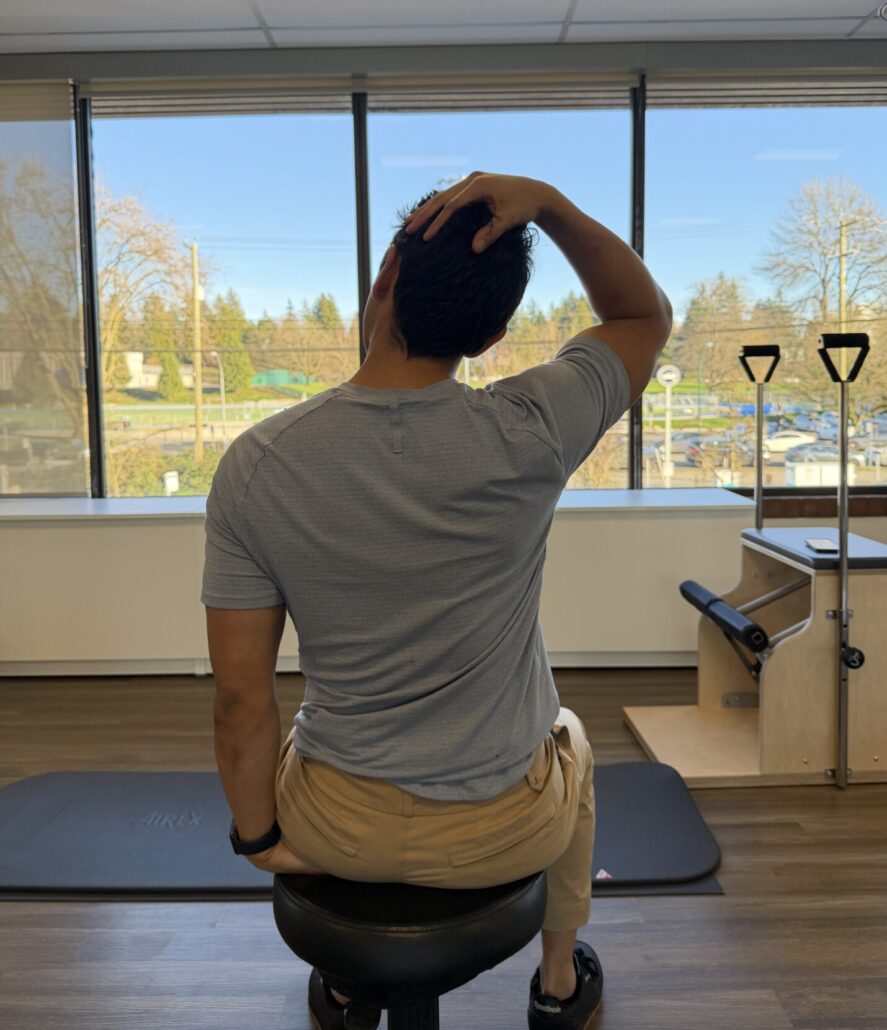
Stretch:  Upper trapezius stretch — gently tilt ear toward shoulder, assist with hand, hold 20 seconds each side.

Strengthening:  Scapular squeezes — sit or stand tall, squeeze shoulder blades together, hold 5 seconds, repeat 10–15 times.

Wrist or thumb pain (“Mommy’s thumb” / De Quervain’s)

Cause:  Repetitive lifting and gripping, particularly lifting from under a toddler’s arms.

Stretch:  Thumb and wrist stretch — gently place thumb inside a loose fist, and tilt the wrist away from your thumb. Hold 30 seconds.

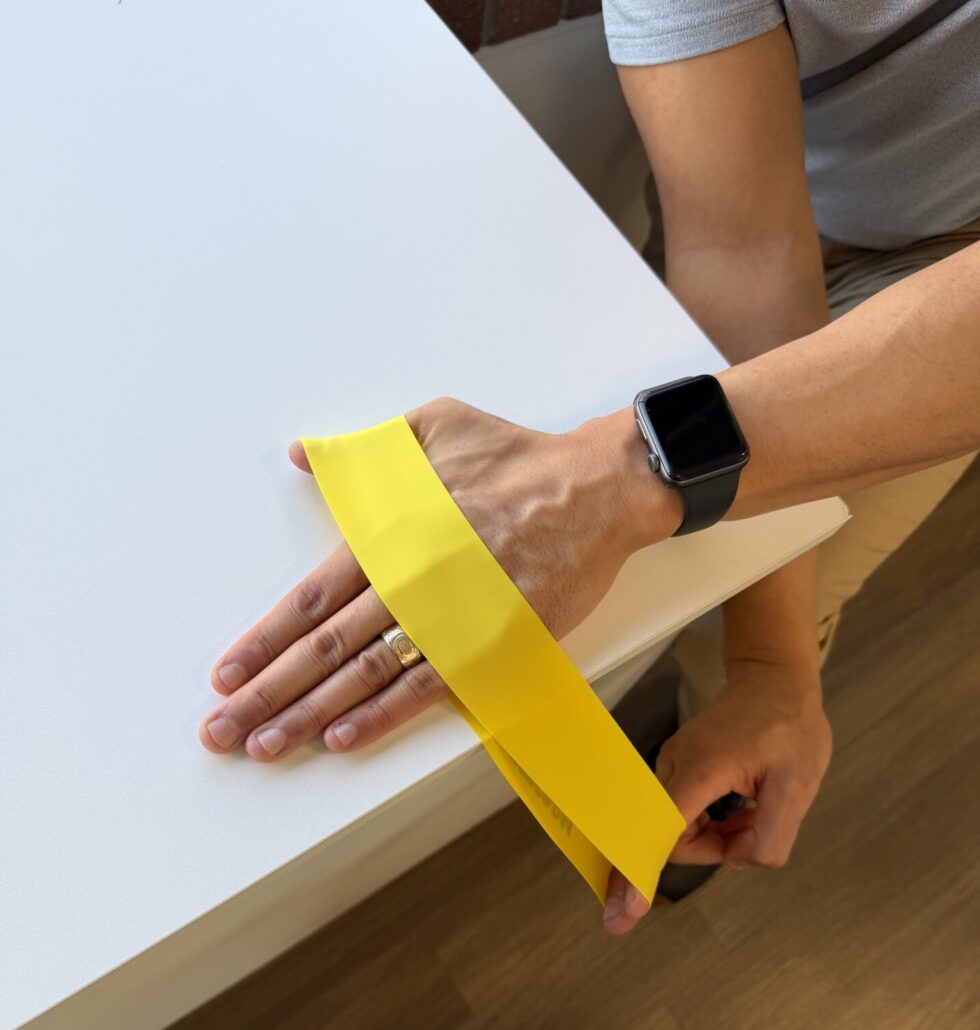
Strengthening (after an initial period of rest and/or bracing):  Thumb extension — use a light resistance band around thumb and fingers. Slowly move thumb away from the fingers against resistance. Repeat 10 times.

Forearm pain near the elbow


Cause:  Sustained hold of baby

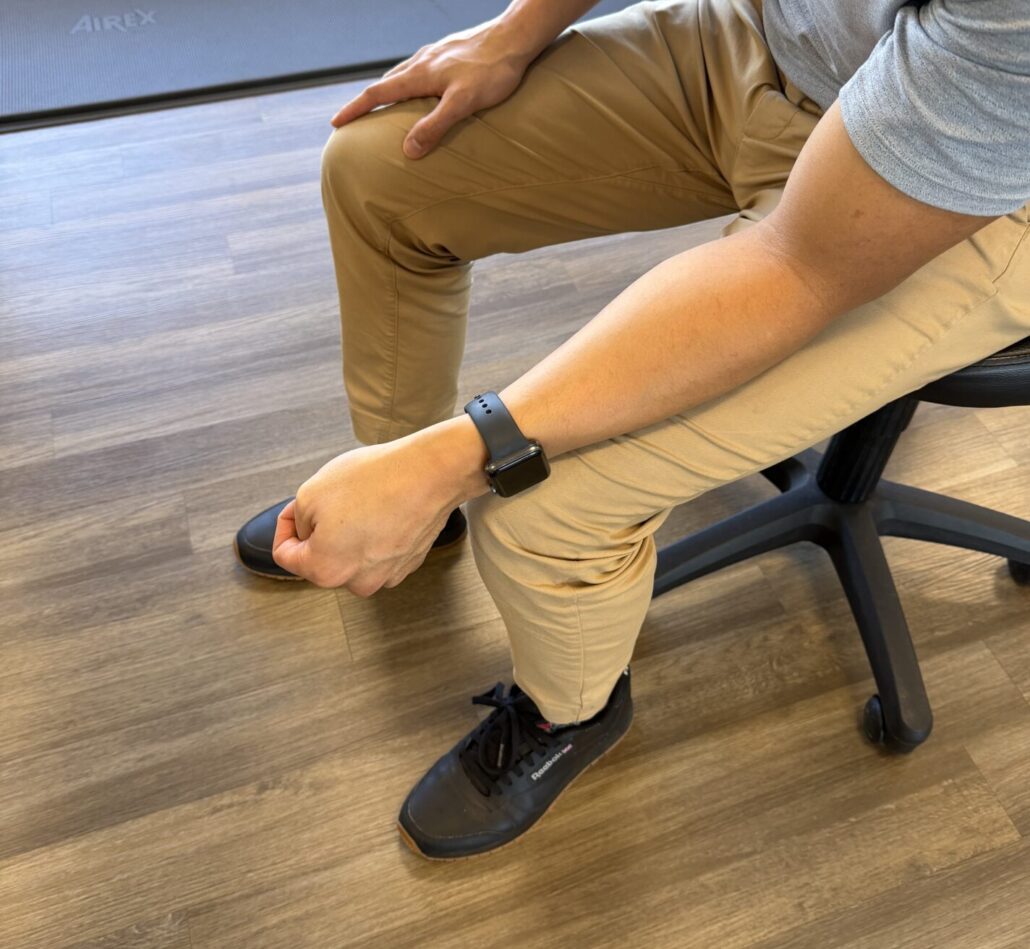
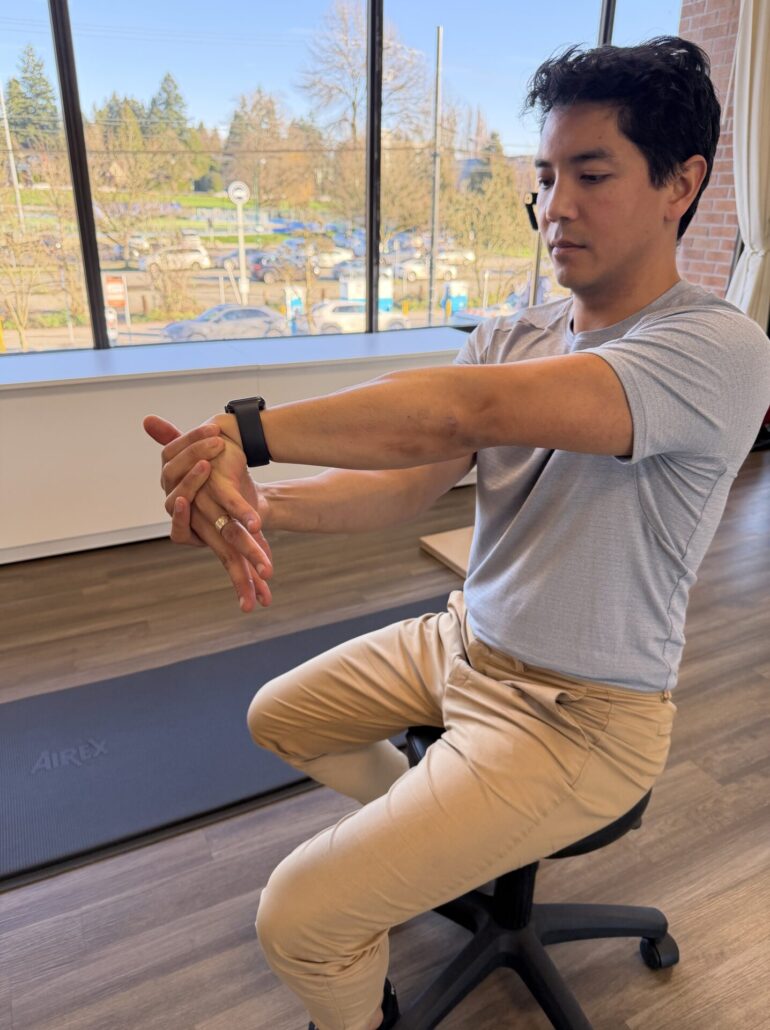
Stretch:  Elbow extension. Extend elbow and pronate the forearm, and flex your wrist using your other hand. Hold for 30 seconds.

Strengthening:  In this scenario, the stretching is often more important as you are building isometric strength while holding your baby!

Hip tightness

Cause:  Prolonged sitting or floor time

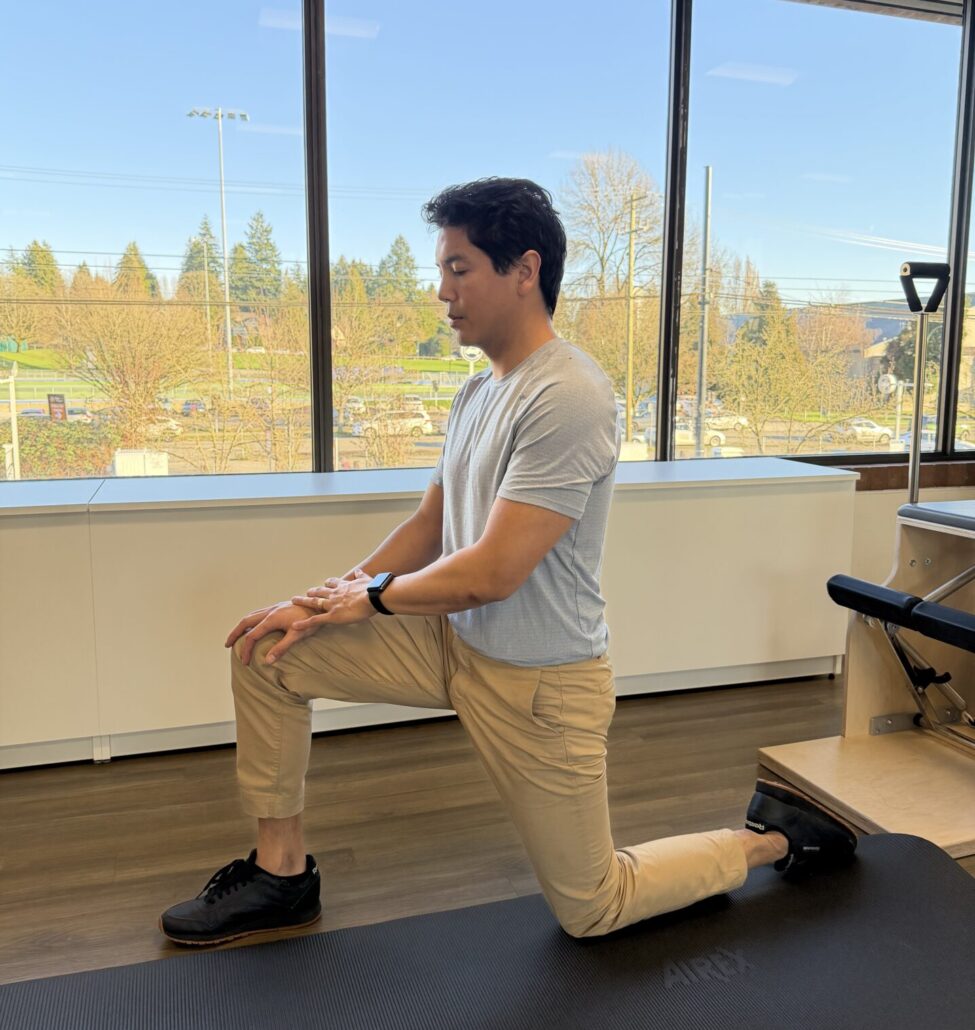
Stretch:  Half-kneeling hip flexor stretch — one knee on the floor, other foot forward, gently shift weight forward, core engaged. Hold 20–30 seconds each side.

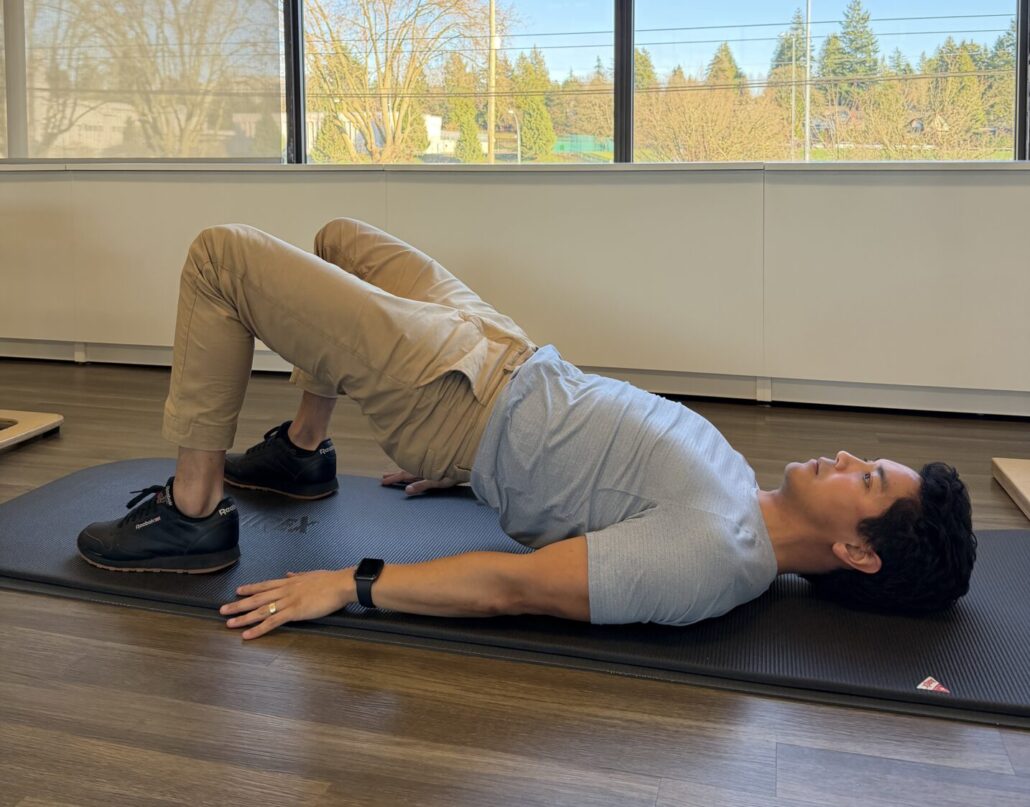
Strengthening:  Glute bridges — lie on your back, knees bent, lift hips off the floor, hold 2–3 seconds, repeat 10–15 times.

Finding Time When There Is No Time

For most parents, finding extra time to exercise feels unrealistic. If this is the case, instead of adding something new to your day, I suggest to move with your kids. Toddlers love crawling, climbing, and playing — and many of these movements are exactly what our bodies need.

Play that helps your body too:

  • Crab walk: Opens the chest and strengthens shoulders, countering rounded posture.
  • Bear or lizard crawl: Builds core, shoulder, and hip strength while staying mobile.
  • Stretching during playtime: Use a half-kneeling position to stretch hip flexors while keeping your core engaged while staying at eye level height with your kids.

Even short bursts of play like this help reverse the hunched posture parents often develop. Physiotherapy can help you stay comfortable, confident, and able to keep up with your kids — now and as they grow!

By Jonathan Tom-Yew

Stronger Bones, Stronger You: How Strength Training Supports Bone Health as We Age

Strength Training: A Powerful Tool for Supporting Bone Health

When many people think of strength training, they imagine building muscle, improving fitness, or boosting cardiovascular health. But strength training offers another powerful—and often overlooked—benefit: improved bone health. As we age, this becomes increasingly important for maintaining independence, mobility, and overall well-being.

Understanding Osteoporosis and Its Connection to Muscle Health

Osteoporosis is a common condition in older adults, characterized by decreased bone density and an increased risk of fragility fractures. Closely linked to osteoporosis is sarcopenia, a condition involving the loss of skeletal muscle mass, strength, and function.

These conditions are closely connected because muscles and bones work as a team—they share anatomical, metabolic, and chemical pathways. When muscle strength declines, bone health often follows, making it essential to consider both together.

Why Strength Training Matters

Exercise—particularly resistance training—has consistently been shown to be one of the most effective ways to counteract age-related declines in both bone and muscle mass.

Resistance training may include:

  • Body weight exercises
  • Free weights
  • Resistance bands
  • Cable or weight machines

As muscles contract and generate force, they create beneficial stress on the bones. This stimulates bone-building cells and helps maintain or improve bone density over time.

Simply put: strong muscles support strong bones.

How to Begin a Strength Training Routine

You don’t need to be a lifelong gym-goer to benefit from strength training.

Physiotherapists and Kinesiologists can perform personalized assessments and develop targeted exercise programs tailored to your health status and goals—especially helpful for individuals with osteoporosis or those concerned about injury prevention.

Make sure to read to the end for a video demonstrating simple resistance exercises to get you started!

Take the First Step Toward Stronger Bones

Ready to build strength, confidence, and healthier bones? Here are three ways to get started:

  1. Book an Assessment: Schedule an appointment with one of our Physiotherapists for a customized strength and bone-health program.
  1. Join a Beginner Strength Class: A safe, supportive environment to learn proper technique and gradually build strength—perfect for those with osteoporosis or new to resistance training.
  1. Try Our Starter Exercise Routine: Watch the video included below and follow along at your own pace to begin building foundational strength today.


Your future mobility, independence, and confidence start with a single step. Let’s take it together.


By Christianna Cheung

The Contact Continuum: Considerations, Targets, and Structure

The 2025 Women’s Rugby World Cup Final was played just a month ago in front of record-breaking crowds, and Canada’s dominance through the tournament reflects the rise in contact sport participation in Canada². As good as it feels to break a tackle or slip past a hard check, we know it doesn’t always go according to script. Whether it’s an ankle knock, a shoulder issue, or even a concussion, we’re here to make sure you have a concrete plan to get back on your feet efficiently and safely.

Contact Considerations

It goes without saying – contact is complicated! Regardless of the sport, entering contact is technical and requires a careful combination of learned skill and physical force¹⋅³. When breakdowns in these areas occur, injury risk can increase—which might mean you’re checking in with our team sooner than you may have expected. 

A physiotherapy initial assessment will gather information regarding your injury and will test different structures depending on the nature of your injury. This helps us understand the severity of your injury and determines where the recovery starting line is. Remember, this is a team effort! An effective recovery plan is a collaborative effort between the therapist and you – there are no cookie-cutter rehab programs here.

I’m Out of Pain – Now What?

Stepping back on the training pitch can feel daunting, but this is where a structured rehab approach really shines. There’s a fine balance to keep: too aggressive and we risk re-injury, but being too cautious can lead to unnecessary delays. Your physiotherapist will work with you to determine your specific training targets depending on your injury and sport demands to make sure you get back to training safely, efficiently, and confidently, which could look like the example below.

Sample  Return to Contact Progression

In-clinic Testing

– Indicated by the type of injury, your physiotherapist may test for limb strength asymmetries, muscular/cardiovascular endurance, reaction time, and/or sport-specific balance.

Non-contact training

– Individual or team training focused on technical skills at an increased intensity without contact. Typically completed without protective equipment to encourage a focus on technical quality without the “autopilot” contact focus to build confidence on-feet.

Contact Exposure – Pads

– Team training where contact is initiated by you against a tackle bag or foam cushion. Specifically non-person contact to build confidence and dose intensity appropriately. This session may also include you receiving contact from these tackle bags, but not directly from other players.

Contact Exposure – People

– Team training with individual drills where you give and receive contact to/from other players in controlled drills. This is typically submaximal at a “training intensity”.

Contact Exposure – Match Simulation

– Team training at full match intensity with full contact in short durations. This typically starts with controlled drills and should progress to unstructured or unplanned reactionary match situations.

Match Play

– A reduced-minutes return to match exposure.

Return To Play Monitoring

Stepping back into the matchday squad is an exhilarating feeling, but this doesn’t mean you’re being thrown back without support. Your physiotherapist will continue to modify your Return To Play structure as needed in collaboration with your coaching staff and yourself to make sure the last pieces of the rehab puzzle go according to plan. There should be a smooth handoff from your rehab team back to your performance team, and you can continue check-ins with your physiotherapist through this process as needed.

Taken a knock and looking to get back on your feet? Come by for a chat and let’s get started!

Written by: Ben Dyck


References:

  1. Martin, E., Beckham, G. Force production during the sustained phase of Rugby scrums: a systematic literature review. BMC Sports Sci Med Rehabil 12, 33 (2020). https://doi.org/10.1186/s13102-020-00174-z
  2. Sport Participation Among Children and Youth. Canadian Fitness and Lifestyle Research Institute. (2024, June 25). https://cflri.ca/publication/sport-participation-among-children-and-youth/ 
  3. Trewartha, G, Preatoni, E, England, ME & Stokes, KA 2015, ‘Injury and biomechanical perspectives on the rugby scrum: a review of the literature’, British Journal of Sports Medicine, vol. 49, no. 7, pp. 425-433. https://doi.org/10.1136/bjsports-2013-092972 
  4. Image 1: Adrian Dennis AFP
  5. Image 2: Networld Sports

Menopause and Frozen Shoulder: How the Two Might be Connected, and How Acupuncture and Cupping Can Treat Both

Frozen Shoulder: A Symptom of Menopause?

Frozen Shoulder (FS), or adhesive capsulitis, is a condition that causes pain, stiffness, and limited mobility in the shoulder joint. It can be a result of a combination of hormonal changes, injury, and prolonged shoulder immobilization, leading the connective tissues surrounding the shoulder to become thickened and inflamed. This can lead to scar tissue formation and further restriction of movement.

FS primarily affects adults, especially those between 40 and 60 years old, and it occurs more often in women than men. This has led researchers to believe there may be a hormonal link at play. The Traditional Chinese Medicine (TCM) term for “frozen shoulder” translates into English as “shoulder at the age of 50 years”.

Frozen shoulder typically progresses through three stages:

  1. The freezing stage: marked by increasing pain and reduced mobility.
  2. The frozen stage: where stiffness is most severe.
  3. The thawing stage: during which movement gradually improves.

Frozen shoulder can develop over months and may last up to two years if untreated.

Benefits of Acupuncture and Cupping for Frozen Shoulder

In TCM, there is an understanding that different people can have the same symptoms, but have different underlying conditions that are causing pain and other symptoms. The specific presentation of symptoms can help an acupuncturist determine the underlying root causes of the condition and treat them accordingly.

Acupuncture and cupping aims to restore your body’s energy balance, known as Qi, which flows through meridians or pathways. When Qi is blocked or unbalanced, you may experience pain and dysfunction, like in the case of FS.

Acupuncture and cupping helps to treat FS by stimulating the body’s natural healing processes by needling into specific acupuncture points. The benefits include:

  • Increased Blood Flow: improving circulation around the shoulder joint, ensuring that oxygen and nutrient-rich blood reaches the affected tissues. This increased blood flow promotes healing, reduces stiffness, and accelerates recovery. Improved circulation can also reduce swelling.
  • Reduced Inflammation: Reduction in inflammation decreases pressure on surrounding tissues, easing pain and allowing for greater mobility.
  • Relaxation of Tight Muscles: Relaxation of muscles reduces the tension contributing to pain and stiffness while promoting a more balanced flow of energy throughout the body. Improved energy flow can enhance the body’s overall healing process. By relaxing muscles and increasing joint lubrication, acupuncture promotes a greater range of motion.
  • Promotes Holistic Healing: Acupuncture not only targets physical symptoms but also supports overall well-being by addressing stress, anxiety, and fatigue associated with chronic pain.
  • Cupping: Involves placing specialized glass cups on the skin to create suction. This vacuum effect lifts the skin and underlying fascia, increasing circulation and loosening tight tissue. For FS, cupping is typically applied around the joint and shoulder blade.

The number of sessions required varies, but most people see noticeable improvements after 4 to 6 sessions. For chronic or severe cases, a longer course of 8 to 12 treatments may be needed. 

In some cases, individuals with complex conditions may require maintenance sessions beyond the initial course of treatment. These ongoing treatments help sustain progress, prevent symptom recurrence, and further enhance shoulder flexibility and function.

The ability to customize the treatment plan ensures that each patient receives care tailored to their unique needs, maximizing the benefits of acupuncture.

The Menopause and Frozen Shoulder “Double Hit”

There is no current evidence that directly links menopause and frozen shoulder. But it’s likely that changing hormones during menopause can put folks at risk.

Menopause is the stage of life in which people who have periods no longer have one. This occurs due to declining levels of the hormones estrogen and progesterone. Estrogen is also good for the joints, as it protects the cartilage, stimulates bone growth, and helps regulate inflammation. Low levels of estrogen cause many of the symptoms of menopause, like hot flashes and insomnia.

For many, the onset of FS during perimenopause or menopause feels like a double burden. Not only are they dealing with menopausal symptoms, but the sudden, sharp pain and reduced mobility in their shoulders make day-to-day activities even harder.

Acupuncture is exceptional at both treating hormone imbalances and reducing pain. Other symptoms of menopause that acupuncture can help with, include:

  • Night sweats
  • Mood changes
  • Anxiety
  • Fatigue
  • Low back pain

Early intervention through acupuncture and physiotherapy can help maintain shoulder function and prevent the condition from progressing.


Written By: Yvonne Sui

Oncology Physiotherapy: Our Approach to Your Healing Journey

I’ve been working with people affected by cancer for about 10 years. My first client was going through breast cancer treatment and had been advised to exercise, but pain in her Achilles tendon was holding her back. Supporting her led me to dive deeper into understanding how chemotherapy and other cancer treatments affect tendons and tissues throughout the body. She shared her experience with others in her recovery community, and from there my oncology-focused practice began to grow.

Over the years, I’ve worked most often with people recovering from breast cancer, helping with pain and reduced mobility following surgery or radiation. This commonly affects the shoulder, arm (including cording), neck, upper back, and ribcage.

As a Fellow of the Canadian Academy of Manual and Musculoskeletal Physiotherapy (FCAMPT), I bring advanced training in hands-on techniques to restore mobility and reduce pain. Manual therapy can be very effective, but research — and my clinical experience — consistently shows that exercise is one of the most powerful tools in cancer recovery. Exercise helps manage side effects such as fatigue, mood changes and nausea, and supports return to daily activities, recreation and work. Excitingly, emerging evidence suggests exercise may also improve long-term survival.

I’m now focusing my practice fully on oncology physiotherapy, supporting people with all types of cancer. My approach is calm, empathetic, and collaborative; it is always tailored to your unique needs and goals. Together we’ll develop a treatment plan that may include:

  • Exercise prescription — ranging from breathing and gentle mobility, to strength and conditioning, to progressive return-to-sport or work programs.
  • Education and guidance — to support safe return to activity, optimize recovery and health, and build strategies to manage pain and other symptoms.
  • Manual therapy — when needed, to improve movement, reduce pain, and complement exercise.

Every cancer journey is different, but physiotherapy has so much to offer in helping you recover, regain confidence, and get back to the things that matter most to you.

Written By: Kate Kennedy

Ankle Sprain from Summer Sports? Here’s Everything You Need to Know to Get Back Out There


Ankle sprains or “rolling an ankle” is one of the most common injuries and is often underestimated. Whether it happened during sport, a misstep off a curb, or a slip on an uneven surface, how you manage your sprain in the early stages can significantly impact your recovery.

What Is an Ankle Sprain?
An ankle sprain occurs when the ligaments (tough bands of tissue that stabilize your ankle joint) are forced beyond their normal range of motion resulting in a stretch or tear, usually from rolling or twisting the ankle. Ankle sprains primarily affect the outside of the ankle, often including the anterior talofibular ligament (ATFL), the calcaneal fibular ligament (CFL), and in some instances the posterior talofibular ligament (PTFL).

The Three Different Grades of Ankle Sprains:

  • Grade 1 (Mild): Slight stretch with microscopic tearing, minimal swelling and tenderness, no loss of joint stability. Sport is usually resumed within a couple of weeks.
  • Grade 2 (Moderate): Partial ligament tear, more swelling/bruising/and pain, little to no loss of joint stability. Treatment is required (the sooner the better) and it is typically at least 3 to 6 weeks before activity resumes.  A protective brace or taping is often needed to aid recovery.
  • Grade 3 (Severe): Complete tear of ligaments, significant swelling, instability. Full recovery may take several months. There is usually permanent laxity or looseness of the ligaments. A brace should be used to assist with stability, healing, and resumption of full activity.
  • In some cases, often those with higher impact like landing from a jump, an avulsion fracture can occur. This means that a small piece of bone is broken off where the ligament attaches. A physiotherapist or doctor can help rule out if you need x-rays for a potential fracture.

How Physiotherapy Helps:

  • Diagnose and determine the severity/grade of the injury
  • Swelling and pain management in early stages
  • Targeted exercises to restore range of motion, strength, and balance
  • Manual therapy to improve joint mobility
  • Return-to-sport plans and injury prevention education

When Can You Return to Activity?
Every sprain is different, but returning too soon can increases your risk of re-sprain. A physio-guided rehab plan ensures you’re not just pain-free, but functionally ready.

Sprained Your Ankle Recently?
Immediately after injury let P.E.A.C.E. guide your approach:

P-Protection: in the first 1-3 days avoid movements or activities that increase pain.
E-Elevation: elevate the injured leg higher than the heart as often as possible to help reduce swelling.
A-Avoid anti-inflammatories: avoid taking anti-inflammatory medications or icing the injury as it will reduce tissue healing.
C-Compression: use elastic bandage (ex: tensor) or taping to reduce swelling.
E-Education: a guided active approach is helpful for recovery.

Don’t wait for it to “just get better.” Book an assessment today and let’s get you back on your feet!

Written By: Danielle Carter


References:
Dubois B, Esculier J. Soft-tissue injuries simply need PEACE and LOVE. British Journal of Sports Medicine 2020;54:72-73.
Hubbard TJ, Hicks-Little CA. Ankle ligament healing after an acute ankle sprain: an evidence-based approach. J Athl Train. 2008 Sep-Oct;43(5):523-9.
Martin RL, Davenport TE, Fraser JJ, Sawdon-Bea J, Carcia CR, Carroll LA, Kivlan BR, Carreira D. Ankle Stability and Movement Coordination Impairments: Lateral Ankle Ligament Sprains Revision 2021. J Orthop Sports Phys Ther. 2021
Apr;51(4):CPG1-CPG80.


Move Better and Hit Harder on the Court: An Exercise Program to Prepare You for Tennis Season

Summer is right around the corner, and with the French Open concluded and Wimbledon here, I am sure we are all rushing out the door to lace up those tennis shoes.

Players like Alcaraz and Coco have certainly shown us why working on our physical strength can make such a big impact on the court.

Whether you are looking to compete in local tournaments or get together for a casual doubles match with your friends, here are 5 exercises for the lower body, upper body and core that I would consider!

Lower body 

  1. Squats: Great for building lower body strength, do these if you don’t want to have knee pain. 
  2. 3-way lunges (forward/side/back): With tennis being such a dynamic sport, there is a strong requirement to be able to lunge in all directions. 
  3. Single-leg hinges: Great for strength, balance and stability while targeting your glutes, hamstrings and core. These are all the important muscles for movements such as sprinting. Do this exercise if you don’t want to lose points from drop shots.
  4. Monster walks: Great for lateral movement on the baseline during groundstrokes or when you do your split stance at the net to get that volley winner. 
  5. Calf raises- double leg or single leg: Important for explosive movements such as jumping, running and quick directional changes. Do these and your Achilles will thank you. 

Upper body 

  1. ½ kneeling single-arm dumbbell shoulder press: Enhance your core stability and power: more aces, more free points. You’re welcome.
  2. Supine dumbbell pec flies: Whether you like to hit the ball flat or with top spin, strong pectoral muscles will help with the power of your groundstrokes and serve.
  3. Pull-ups or lat pulldowns: Strengthen your back and improve your posture so you don’t use the sun as another excuse for missing that easy overhead smash.
  4. Rows: Strong scaps, healthy shoulder, enough said.
  5. Forearm stretch and strengthening: Do these unless you like tennis elbows? 

Core

  1. Bird dogs: Improve core stability, balance and coordination. Lower back pain? No thanks 
  2. Side planks: Improve your rotational power and stability. KEY to generating power in your forehand and backhand. 
  3. Forearm plank: Upper back, shoulder and core stability. This is your 3 in 1, talk about efficiency. 
  4. Palloff press in split stance: Core stability to unleash your forehand and backhand.
  5. Dead Bugs: Coordination and core stability, never wiff a ball again! 

Check out this video to see examples of each exercise:

All jokes aside, these are not the only exercises to help your tennis game. But these foundational movements will certainly help with injury prevention, so you can keep playing the game you love!

Written By: Victor Choy

Step into Summer: How Clinical Pilates Can Help You Hit the Trails Stronger


With the days getting warmer and summer adventures calling, many of us are itching to lace up our boots and hit the trails. Hiking is a fantastic way to enjoy nature, build cardiovascular fitness, and reset mentally. But before you dive into steep climbs and uneven terrain, it’s important to make sure your body is ready for the challenge, especially if you’ve been dealing with stiffness, aches, or old injuries. If you’re feeling a little out of step after a busy spring, you’re not alone.

Whether you’re easing into day hikes or training for a multi-day trek, working with a physiotherapist trained in Clinical Pilates can help you move more efficiently, manage lingering discomfort, and reduce your risk of injury. Most importantly, it can help you feel stronger and more confident on the trails.

Why Prepare Your Body For Hiking?

Hiking challenges more than just your lungs. Long climbs, rocky terrain, descents, and carrying a pack can put stress on your knees, hips, ankles, and back. Many hikers experience lower back discomfort, or fatigue in the stabilizing muscles that support posture and movement. Taking the time to prepare your body before you ramp up mileage or elevation can help prevent common injuries like knee pain and ankle sprains. It also means you’ll move more confidently and enjoy your hikes without nagging discomfort.

How Clinical Pilates Can Help You Move Better on the Trails

Every hiker has a unique body and movement history, which means their needs and challenges on the trail are equally unique. Whether you’re recovering from an injury or feeling stiff after months at a desk, a tailored approach is key. Clinical Pilates offers a personalized way to address your specific biomechanics and goals.

Working with a physiotherapist trained in Clinical Pilates means you’re receiving guidance based on thorough assessment and clinical reasoning. Physiotherapists are trained to identify joint restrictions, movement inefficiencies, and muscle imbalances that could limit performance or lead to injury. With this understanding, they will design a program focused on improving strength, mobility, and control where you need it most.

Some key areas that Clinical Pilates might target include:

  • Strengthening your hips, knees and ankles to tackle hills and uneven terrain
  • Enhancing core control for hiking endurance
  • Improving balance and proprioception to reduce the risk of slips and falls
  • Restoring mobility and movement efficiency to help you stay light on your feet
  • Addressing old injuries that still affect loading patterns, confidence, or stability

The goal is to help you move with greater ease and control, focusing on the areas that will support you most on the trail, so that you can hike longer, stronger, and with more confidence!

Get Trail-Ready This Summer!

Whether you’re managing old injuries or simply want to feel stronger and more stable, now is the perfect time to get your body trail-ready. Clinical Pilates can help you hike longer, with less discomfort and more ease. By focusing on your body’s unique needs, you’ll be better prepared to enjoy everything the season has to offer – one step at a time.

Written By: Alexia Lee

Understanding the Pelvic Floor: Why You Should Care About Your Pelvic Health

First off, what is your pelvic floor?


The pelvic floor is made up of two layers of muscles at the base of your pelvis. These muscles attach to your pubic bone in the front, the tailbone in the back, and the sitz bones on the sides. Imagine a hammock that supports all the organs in your pelvis. In a well-functioning pelvic floor, these muscles contract and relax in a coordinated way to allow for normal bodily functions. For example, they relax when we go to the bathroom and contract when we cough or sneeze.

Source: https://www.kenhub.com/en/library/anatomy/muscles-of-the-pelvic-floor


What happens when the pelvic floor isn’t functioning properly?

Sometimes, the muscles of our pelvic floor lose the ability to contract strongly, relax fully, or contract and relax in a coordinated way leading to pelvic floor dysfunction. Like any muscle in the body, we want both mobility and strength in our pelvic floor muscles. 

Pelvic floor dysfunction might look like:

  • bladder or bowel leaks
  • peeing often (frequency) 
  • having a strong or uncontrollable urge to pee (urgency)
  • constipation
  • pain with penetration (speculum, tampon, or penetrative intercourse)
  • sexual dysfunction 
  • pelvic, tailbone, or low back pain

There can be many causes for pelvic floor issues including:

  • pelvic or abdominal surgeries
  • pregnancy and childbirth 
  • chronic coughing
  • chronic constipation 
  • menopause or other hormonal changes
  • posture
  • lifestyle choices and toileting habits 
  • genetics and certain medical conditions

How can a physiotherapist help?

Some physiotherapists have special training in assessing and treating conditions that affect the pelvic floor. In a pelvic health assessment, a physiotherapist will perform a detailed evaluation and identify what factors are relevant to you and your symptoms. They will then develop an individualized treatment plan with you to help address your concerns and achieve your goals. Kegels aren’t the answer to everyone’s problem! Sometimes the answer lies outside of the pelvis and a physiotherapist can help to identify what is most relevant to your case.

Our pelvic health physiotherapists are trained to help with pelvic floor dysfunction, so book an appointment to discuss any concerns relating to your pelvic floor!

Written by: Natalie Constantin